The ‘ART of the ARC’ – part 2
Part 2 of the ART of the ARC…

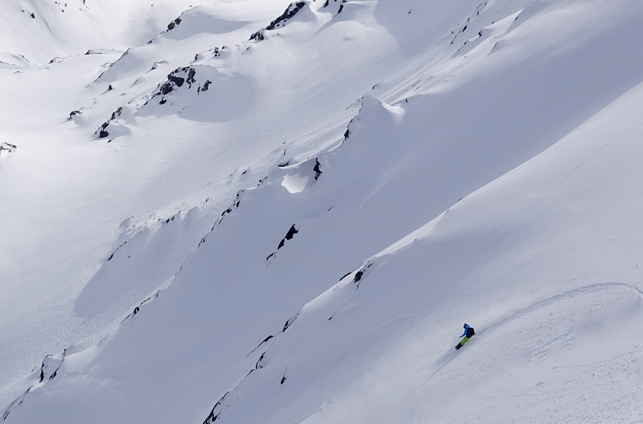
So in part 1 of ‘the ART of the ARC’ I introduced you to my obsession and passion of turning a Snowboard.
For me, there’s something satisfying and addictive about the carve, the power through your feet, the resistance and balance over that knife edge as you cut and change direction in a perfect arc.
The Snowboard is the perfect tool for the job in my opinion.
I search constantly to get the same feeling in my Surfing and when it happens, it feels amazing, but (maybe, probably, definitely, its my lack of ability or the constantly changing canvas of the wave that makes that feel of perfection more challenging) on a Snowboard, once you have understood and practiced the technical dynamics of the arc, the field of opportunity to practice is a lot more forgiving and constant, the progression is swift and it quickly becomes about your physical ability, your understanding, your passion, your drive and your feel for the ‘Art of the Arc’.
Here in Part 2, we’re going to look at the technical dynamics of turning a Snowboard.
We’re going back to the basics.
The basics are your foundations. This is what everything else is built upon. If you build solid foundations, then your create a solid base on which your progression will never end.
We’re going to look at the three essential elements of the turn.
If you can grasp and understand the importance of each of these elements and see how they link and work together then you’ll always be able to workout problems and improve, or simply use this understanding to delve deeper into your love for riding and enjoy the search for that illusive ‘perfect turn!’
Try to understand each of these essential elements individually and explore them individually as your ride.
Try to feel the link between them but understand them as individual pieces of the same puzzle.
I try to work on the micro movements or micro pieces of time between the bigger movements.
For example, I might try to feel the passage of pressure running down the edge, the micro movements of pressure through my feet as I transfer it to where I want it to go, and the subtle feeling of growing resistance as my body balances and feeds the action and flexion of the board.
Combining these 3 essential elements creates limitless variations.
This is what makes our journey in Snowboarding never ending, so fun and makes the ‘perfect turn’ so illusive.
Beyond the essential elements there is a whole world of exploration.
Here you open the doors to nature, conditions, terrain shape, individual style and interpretation, inspiration and influence. Things that we will discuss in part 3, but for now, we’ll stick to taking a look at the foundations, build the base and let it soar.
The 3 essential elements involved in turning a snowboard are, the Physics of the arc, an understanding of how the board works and an understanding of your perfect stance.
1. The Physics.
Here we look at understanding that we control our speed by line following arcs rather than straight lines.
Understand the difference between skidding to lose speed, breaking against the line of travel, and the control of speed by riding a line that works with the mountain and the board to create a flowing ride.
So, first you need to appreciate that an object traveling forwards with speed changes direction, most efficiently in an arc.
Only cartoon characters such as Wiley Coyote can change direction at acute angles, for the rest of us trying to change direction instantaneously on the spot would be pretty inefficient, requiring that we stop travelling in one direction before travelling in the other.
Imagine what would happen if when riding your bike you just turned the wheel all at once in the direction you wanted to end up travelling in next.
You’re very probably not going to turn straight away and would come to a stop in some way or other (maybe on the floor in front of your bike) before you could actually change direction.
Turn slightly leading gently into an arc and you’ll be a lot more successful in getting to where you want to go in an efficient manner.
It’s kind of why a running track has a gentle arc at the end and the bends of the road are curved.
So momentum changes most effectively in an arc. The shape of the arc depends on things like speed, grip, line and terrain shape along with the forces and control applied.

‘This is pretty simple to understand, but many people look around the mountain in straight lines rather than arc of travel’.
Next understand that, when travelling with the pull of gravity down the hill, the more you turn against gravity, the more you’ll control your speed.
Understand that turning in an arc is a lot more efficient and feels better than a rotation against the line of travel leads to a more flowing ride, but also that if you’re not breaking the line of travel to control speed, how much you turn needs to control your speed instead!
Basically, the more you finish your turns, the more you’ll control your speed. This is the link between control of speed by the line you ride.
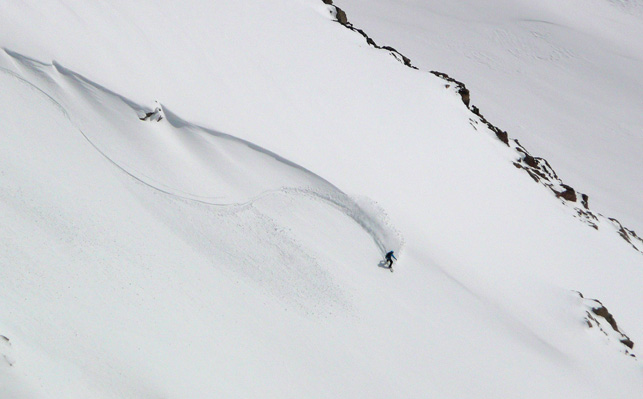
It is the beauty of creating flowing lines that work and explore the terrain of the mountain.
We will look more at this in Part 3 of this series.
There are basically two parts to the arc.
The first part of the arc runs from the initiation of the arc towards the fall line (an imaginary line down the hill that gravity pulls in).
This part of the arc starts gently on the edge and builds momentum as you start to point down the hill.
The second part of the arc controls, directs and uses the momentum gained in the first half of the arc.
This part feels strong and how much you turn here dictates the speed with which you will exit the arc and control the speed and line of travel into the next one!
Other factors affecting your control of speed by line might be the size and shape of the arc.
Not all arcs are the same size and the same shape.
The smaller the arc, the less time you’ll spend accelerating through the arc.
The greater the arc, the more acceleration you can build within the arc.
The size and shape of the arc changes everything.
A longer entry arc will allow speed to build towards the fall line.
A sharper, shorter entry arc will build less speed.
An exit arc that flows around and back ‘up’ the hill will control speed greater than a flatter more open exit arc.
A longer exit arc will allow more speed to run in the arc and a sharper exit arc will control speed in a shorter time/space.
Control of speed by line allows your riding to flow with the terrain.
The shape, size and frequency of your arcs might be in part dictated by the shape, gradient and consistency of the terrain your ride.
I sometimes find that mind surfing lines on the mountain can help me create possibilities and flowing lines that might inspire me to ride and flow with the terrain shapes that I see.
2. The Technology!
Second essential element of the turn is understanding how the board actually works and how it is designed to turn by design rather than force, in effect, how it is actually designed to turn in an arc with relation to its flex, shape, edge and sidecut.
The snowboard turn starts at what we call the ‘contact point’ which is at the front of the board and is basically the first point of contact on the working, running or turning edge as the board runs along the surface of the snow
The turn finishes at the last point of contact on the boards running edge, the rear ‘contact point’, the last point of contact at the completion of the arc.
Between the fore and aft contact points we have the ‘sidecut’ of the board.
This is the curved shape that is given to the edge of the board and is ‘designed’ to lead the board in an arc if the board is allowed to run along, in a straight line, tilted on its edge.
The shape and size of the sidecut curve dictates the size and shape of the natural arc of the board when tilted onto its edge. This is known as the side cut radius.

A board with more sidecut will in theory turn sharper radius arcs than a board with less sidecut.
However, we can also adjust the shape of the arc by flexing the board more or flexing it less.
The more we bend the board between the fore and aft contact points as it tracks on its edge the sharper we make the arc. The opposite is true.
This also then brings the stiffness of the board into the equation.
The stiffer the board, the less easily it will flex and it will be harder to shape into a sharper arc.
However, if the stiffer board has more sidecut, maybe it doesn’t need to be flexed so much?
Or, if the stiffer board is ridden at higher speeds where the forces of the turn are greater, maybe it will then flex and turn as much as softer board at lesser speed.
Understanding this, will help you understand the reason why there are so many boards with different shapes and flex properties on the market designed for different styles and speeds of riding.
Once you understand this, you need to understand that we can also adjust the shape of the arc at different points in the turn by flexing the board in different places along its running length.
For example, if you push and bend the front of the board more on the entry into the turn then you will create a sharper entry into the turn.
If you bend the rear of the board at the end of the turn you’ll finish the turn with a sharper exit.
The pressure on entry into a turn is generally a lot softer than the forces being dealt with on the exit and so again, boards are designed with an easier flex in the nose and stiffer flex in the rear. The sidecut might also be designed around this, with less in the front (as being softer it will bend more anyway) and more in the rear to accommodate the stiffer tail.
Understanding how we can Shape the arc with regards the flex and tilt of the board is key to understanding how to create a line that controls your speed and flow on the mountain.
Flexion of the board along its length is controlled by how much pressure we run through the edge at any given point through the arc.
We can also apply edge pressure by increasing or decreasing edge tilt.
The more the edge is tilted, the more it bites into the snow and so the pressure increases.
More pressure equals more flex and a tighter arc radius. The opposite is also true.
In the practised snowboarder, a combination of subtle foot movement to apply pressure along the length of the edge of the board along with a combination of precise edge tilt can accurately define, control and shape the arc.
If you follow this so far then you can maybe start to appreciate the link between board flex, sidecut profile, edge tilt and turn shape?
Understanding how to accurately move pressure through your feet to where it is needed over the edge is the missing link and this needs precise and natural flowing movement, dynamic balance and the perfect stance.
3. The Bio mechanics.
No we add the third element, which is based around the simple bio mechanics of the body.
Understanding how the body works to accurately move pressure through your feet to where it is needed over the edge is indeed the missing link here.
We basically all bend, flex and move in a similar fashion and so we should in theory all stand in a similar stance and ride using the same movements to control the board.
Our Bio mechanics is common to all sports and is why when you watch top level athletes compete in their chosen sport, they generally all move and perform in the same way baring individual style if appropriate.
For example, there is no great difference between the technique or movement patterns of the guys running the final of the 100m sprint for, only differences in speed, force and body dynamics governed by their body shape due to genetics.
Individual style, knowledge, practice, strength and body shape might make a difference in level of ability, but bio mechanically we are all based around variations of the same model using the same joint and muscle combinations.
In Snowboarding, the pressure, flex and tilting movments that we need to perform to control the board are set by our desired outcome in terms of speed, line and flow within the terrain and the design specifics of the board.
The movement patterns that allow us to balance and perform these controlling adjustments are going to be relatively similar within us all.
If we’re all primarily looking to make similar movement and balance patterns then surely we will all need to stand in a similar fashion.
This then firstly brings us to stance.
Your stance basically needs to be the best stance to suit ‘your’ body dimensions whilst enabling you to be able to balance, flex and move pressure between your feet in a fashion that allows you to apply it to the edges and length of the board.
Your stance also needs to allow you a good field of view and a relaxed comfortable body posture over both your heel and toe edge.

Some elements of the stance are personal, I like a wide stance, I have long legs and good flexibility in a wide stance. It allows me to move more individual pressure towards the nose or the tail during the arc, which I find, helps me dictate the shape of the turn to a greater degree.
Stance width is a personal thing, but it should be somewhere around the width you’d use for a good powerful deep squat in the gym.
Again, foot angle is kind of up to you but most of us will naturally squat and balance with our knees aligned over our feet with between 20 or 30 degrees of angle difference in our footprint and you should play around with combinations with in this range.
Your front foot angle dictates how turned to the front of the board you will stand and gives you your ‘field of view’. This dictates what you can see with out needing to twist your upper body towards the front of the board, (which will break your natural bio mechanics).
Your rear foot angle will dictate how you move and apply pressure to the rear of the board and also give your field of view when riding switch.
Many riders use a slight negative rear foot angle. Some because they ride switch a lot, and so want it to be the same as riding forwards.
Some because it also allows you to move pressure to the rear contact points of the board, at the end of the turn, using a simple roll towards the outside edge of your, allowing the foot movement to be similar and as effective as the front foot movement pattern at turn initiation.
Note that from a good stance you can see both ways with out having to twist your body, you can flex into a deep natural squat with out compromise of balance and move pressure forward over the nose and back over the tail with out disrupting your bio mechanics and with minimum body movement.
Also note, any twisting of the upper body will create tension and torsion within your natural movement pattern.
Upper body rotation can be used to influence actions, but is not something you should be fighting constantly in your stance as you ride your line.
With the correct stance and with practice, pressure can be moved around the board simply by accurately torqueing your feet to influence the exact point on the edge that you want to apply the pressure too.
Moving pressure to the edge and tilting the board with your feet is one of the most important steps to understand when learning how to turn a snowboard in the beginners progression and beyond.
Note that edge tilt is performed independently through your feet, the front foot and back foot work independently of one another due to the front foot working on entry into the turn and the rear foot working more on the exit.
There is a completely natural pressure movement that runs from the front contact point along the edge to the rear contact point during an arc. It is important to feel this through your feet and understand why it happens and the understand simplicity of this movement.
Once you feel and understand how and why the pressure moves works like this you can then play with influencing it to change the shape of the board and the arc.
You should also note how the ‘amount’ of natural pressure changes during the arc.
Pressure is normally less strong on entry into the arc where there is less edge tilt and the momentum change is gentle. It quickly builds through the middle of the turn and then eventually fades again when the turning phase is complete
Once you understand and feel this natural cycle you can change the amount of pressure you use, for how long you use it and where you focus it to get really inspiring and playful results.
Also note, the end of one turn becomes the start of the next. The pressure movement to the rear foot at the end of the turn sets you up with a platform to move forwards from for the shift of pressure into the next turn.
The angle you come out of the previous turn should have controlled your speed enough so that you can start the next in a straight line to the edge change with out worrying about acceleration.
Combinations of edge tilt, foot torsion and leg power resistance will eventually enable you to make the board do whatever turn you want and follow a flowing controlled line down the mountain.
One last thing to understand is the edge change.
Many people struggle with this in their early days. This is due to them trying to change edge with both feet at the same time or trying to rotate and turn the board into the turn and not using the arc.
Here’s an important point to think about, ‘you can only change edge in a straight line with your momentum’.
I taught both my daughters to turn within 5 minutes of them ever setting foot on a board by teaching them to release the edge at the front of the board from standing, whilst increasing edge tilt on the rear of the board with the back foot.
This allowed the front of the board to track towards the fall line in a natural arc with out momentum.
At the fall line, the front of the board had become flat and the board had slowly started to run, allowing them to change edge inline with momentum.
By continuing the torqueing action of the board through the fall line the new edge is engaged and the board continues to turn by design until the rear foot is forced to follow.
As the rear foot changes edge and follows, focus can shift to the rear of the board to complete the arc and spread the pressure along all of the edge to regain the starting position now on the opposite edge.
The important factor to note here is that edge change is made by slowly rolling the front foot first to the flat base in line with momentum, before rolling to the other edge.
The rear foot remains on the previously working edge until it is forced to follow. Once the rear foot follows, pressure can start to be focused there to finish the arc.
Again this follows the natural flow through the turn from front foot to back foot.
If you like, you can imagine the process as the changing edge of the front tire of a bike as it rolls from one turn to the next.
At no point does the tyre jump from one edge to the other, it is a smooth roll from one edge over the top (flat base) to the other edge of the tyre with the bike running in straight line, the turn doesn’t actually start until the new side of the tyre is engaged.
The rear tyre does the same but is led by the action of the front wheel and steering.
A downhill mountain biker might use the same fore aft pressure riding a tight berm.
On our board we follow the same principle, but on our board we can focus more on flexing and twisting along its length and move pressure front to back and so greatly influence the feel and shape of every part of the arc.
Ok, so here you have the three essential elements for building the snowboard turn.
Understanding why and how we the shape of the arc. Understanding how the board is designed to allow and help us shape the arc and understanding the simple bio mechanics of the body and how the right stance can put us in the best position to apply the controlling movements needed for us to manipulate the board in to the line and arc of our choice.
Understand how these three elements work together and you should be set up for some fun turns and a never ending progression. If at any point you feel like you’ve hit a technical performance platform, all you need to do is dive back into each of these three elements and work through the stalemate.
Once you have a good idea of how the turn works, you need to then look at how to apply everything to the terrain that you ride. The mountain is a constantly changing canvas on which to create your Art.
I hope some of this has made sense to you.
It’s a very simple concept that I might have made seem very complicated.
Basically, my theory is that, if you can understand a little more about what you’re trying to do and how to do it, and build the solid foundations on which to explore it then your riding progression will be endless as you should be able to easily work out what and where any weakness’s are coming from and correct them?
In part 3 of this series we will look at how to apply your riding to the mountains natural terrain using terrain shape to help you create a line that controls speed and flow.

Part 3 is where ‘Mind Surfing’ becomes reality…